Subway - Responsive Multi-Purpose WordPress Theme
Responsive Retina AJAX/Parallax Theme
- created: 10/17/2013
- latest update: 11/04/2013
- by: Qode Interactive
- email: support@qodeinteractive.com
Welcome to Subway - Responsive Multi-Purpose WordPress Theme
Introduction
Installing SUBWAY Theme
You can install this WordPress theme using two installation methods:
- Using WordPress Administration Panel
- Copying theme files via ftp
METHOD 1
Using subway.zip found in ZIP file you downloaded from ThemeForest.com you should perform the following steps:
- Login to WP admin
- Go to Appearance > Themes option and click on it to load new page
- Select Install Theme tab at the top of the panel to load new page
- Click on Upload option at the top of the panel to load new page
- Click on Browse button and locate subway.zip on your file system
- Click on Install Now button
- Once installation is complete you can activate Subway theme
METHOD 2
IMPORTANT NOTE: If you are using FileZilla, make sure to fix it as described below before you copy the files:
http://stackoverflow.com/questions/554960/how-can-i-stop-filezilla-changing-my-linebreaks
Using subway directory found inside of subway.zip file located inside ZIP file you downloaded from ThemeForest.com you should perform the following steps:
- Using FTP client you should login to server where your WordPress web site is hosted
- Using FTP client you should navigate to /wp-content/themes/ directory under your WordPress web site’s root directory
- Using FTP client upload subway directory to themes directory on remote server
- Once installation is complete you can activate Subway theme
Installing WooCommerce
If you plan to build online shop with our theme, please read WooCommerce section of this documentation before you install demo content.
Importing Demo Content
If you would like to learn the best practice of using SUBWAY theme, you can import content from our demo web site. Importing theme is performed using XML file located in theme ZIP file downloaded from ThemeForest and following these steps:
- Open WP Admin Panel
- Click on Tools > Import from left menu
- Click on WordPress item in the list of importers
- If the plug-in is not installed, click on Install Now button
- Select XML file provided with our theme and upload it. It will take couple of minutes to install our theme (If your server is not able to upload the demo files with attachments, you should import it without attachments)
- Click on Appearance > Menus from left menu
- Chose “Main menu” in Top Navigation combo box
Importing LayerSlider Demo
You can import LayerSlider from our demo web site using LayerSlider.json file located in xml export > layerslider folder of ZIP file downloaded from ThemeForest. Please, follow these steps:
- Click on LayerSlider WP from left menu
- Click on Browse button in Import Sliders section, select LayerSlider.json and click Import
Upgrading SUBWAY Theme
IMPORTANT NOTE: If you are using FileZilla, make sure to fix it as described below before you copy the files:
http://stackoverflow.com/questions/554960/how-can-i-stop-filezilla-changing-my-linebreaks
You can upgrade our theme by performing following steps:
- Download latest theme zip file from ThemeForest
- Extract it and locate subway.zip
- Extract subway.zip and locate subway folder
- Copy/Replace the content of subway folder to /wp-content/themes/subway folder of your web site.
Feel free to ask us any question about using features SUBWAY theme offers.
Theme Options
Access the “Qode” General options in the left menu, below Tools and Settings. Set general theme appearance in Qode general options. Some of these options may be overridden locally, in the shortcode or page settings (e.g. text color in editor or slider settings in slider tab when creating a page).
Most options in these tabs are self-explanatory. Explanations for options that need further clarification will be provided here.
GLOBAL OPTIONS
Colors
The elements of SUBWAY theme are made up from 6 main colors. Also, you can edit following colors: Background color, Boxed background color, Highlight color, Selection color. Those options provide global color management, while you can still override them in other sections, shortcodes and custom fields when editing pages, posts and portfolio items.
Google Fonts
Here you can choose default google font which will get applied to body tag. Further in options panel you can choose font options for many elements.
Loading animation
Here you can turn ON/OFF display of loading image while navigating between pages using page transitions (AJAX)
Page transition
Choose between predefined AJAX animations between pages. This scenario will be applied to all pages. Eventually it is possible to change the animation style for each page individually (options below text editor when editing pages/posts). Please note that you can turn off AJAX for certain pages there. That might be important for some other plugins to work properly.
List of internal URLs loaded without AJAX (separated with comma)
Here you can put URLs of the pages you want to get loaded without AJAX. You should enter full url (including domain part) here, for example: http://www.mydomain.com/forum/
Custom CSS and Custom JS
Advanced users can add their own code here.
Meta Keywords
Add relevant keywords separated with commas to improve SEO.
Meta description
Enter a short description of the website for SEO.
GENERAL FONT OPTIONS
This section allows you to setup font properties for different elements of the site.
HEADER AND FOOTER
Header in grid
Set if header is full width or grid (content) width
Show header widget area
This setting applies to Header Left and Header Right widgets.
Top background color
This is background color of the top header widget area
Bottom background color (initial and on scroll)
This is background color of the header
Logo
Add website logo here.
Header height
This option is important for defining the height of whole header including the logo
Menu options
You fully customize layout of the menu by editing all properties here
Mobile menu style
You can customize menu displayed on last 2 responsive sizes.
TItle
You can setup here global page title properties which can be overriden in qode custom fields for each page.
Responsive title image allows you to make image resize to fit into browser width. Title are height will be defined by height of the image after it resizes to fit the browser width.
Parallax title image makes image stay fixed while scrolling the page.
TItle height allows you to set height of title area and is used if image is not set to be responsive.
Title position allows you to set position of title text.
Show footer top
This option will show main footer widget area. You can define its content in Appearance > Widgets > Footer Columns 1-4
Show footer bottom
This option will show bottom footer widget area. You can define its content in Appearance > Widgets > Footer Text
ELEMENTS
Here you can define style properties of different elements.
PARALLAX
Parallax speed
Change the speed of parallax scrolling. Higher value will increase the speed of scrolling. Default speed is 1. Zero will result in a not-moving background.
PORTFOLIO
Here you can define global setting for portfolio single page: portfolio style (layout of the page), lightbox for single page (turn it on/off), number of columns used for portfolio gallery style.
BLOG
Here you can define global properties for blog list and blog single pages. You can override those properties at page/post level.
CONTACT
Mail send to
Here you should enter email address. Contact form data will be sent to this address.
Email from
Here you should enter email address. This address will be displayed as sender when sending contact form data.
reCaptcha
You can enable reCaptcha and enter keys generated here http://www.google.com/recaptcha/whyrecaptcha.
Pin image
You can upload your own image used to mark your address on the map
Google map address (1-5)
You can define up to 5 different locations do display on your map. You should enter address in normal address format, for example: 100 Battery Street, San Francisco, USA.
Google map zoom
You can enter here google map zoom level (default is 15).
Google map height
You can define here height of map area on the page
Google map style & Google map color
If style is enabled, you can set color used to paint the map
Google map scroll on mouse wheel
Turn ON/OFF scrolling of the page when mouse is over the map. That disables/enabled map zoom.
404 PAGE
Here you can define content of 404 error page.
SOCIAL
Here you can manage social share features.
Widgets
Subway Theme comes with following custom widgets and widget areas:
- Sidebar - it's used only for blog posts
- Sidebar Page - it's used only for pages
- Header Left - here you can add anything to the left side of header next to the menu
- Header Right - here you can add anything to the right side of header next to the menu
- Side Area - here you can add widgets to side menu
- Footer Column 1, Footer Column 2, Footer Column 3, Footer Column 4 - here you can add content to footer columns (1-3) in footer top area when four columns layout is selected
- Footer Text - here you can add for example copyright
Subway theme allows adding mutliple sidebars. You can define your custom widget areas (sidebars) from the Custom Widget Area section in the bottom right corner of this page.
You can see example of widgets configurion from our demo web site here:
Shortcodes
Pages/Posts are built using shortcodes accessed by clicking “Qode shortcodes” icon in the top right of the TinyMCE editor. All shortcodes are in the drop down menu listed alphabetically.
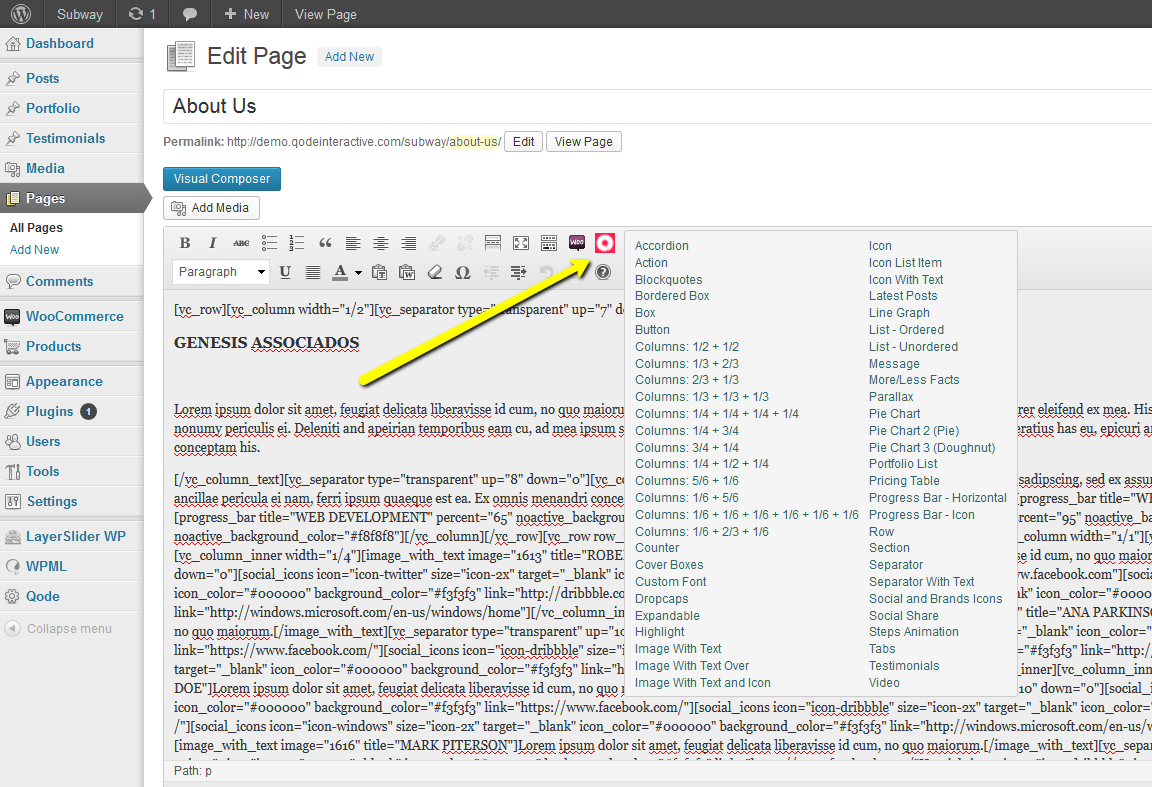
Simpler shortcodes will appear directly in the editor once clicked. More complex shortcodes will display a pop-up window with additional options, different for each shortcode. Change attributes to customize the shortcode before submitting.
IMPORTANT NOTE: If you leave a field empty, the default option will be used.
If shortcodes are customized without pop-up (directly in the editor) change or add attributes between the apostrophes ‘’ (example: message border='yes' or message border='no').
Click on List of Shortcodes menu option to see all attributes for all shortcodes.
Parallax
Subway Theme has unique way of managing parallax directly while editing posts/pages. You can find custom Qode Parallax section under the text editor.
Add parallax section within any page to create parallax effect. Combine multiple parallax sections to create a full parallax page.
Step 1. Insert a parallax section into a page by adding the shortcode from the dropdown menu. Enter the height of the section between apostrophes ‘’ (example: [parallax_section id='1' height='800']. If left empty, default height of 200px will be used. Also, choose if you want to display back button at the bottom of parallax.
Step 2. Add a new parallax section in the “Qode Parallax” below the editor and “Qode Sliders”. Note that like with sliders, the Unique ID must be exactly the same value as in the shortcode (example: [parallax_section id='1']. Images must be higher than parallax section height in order to avoid blank space between sections.
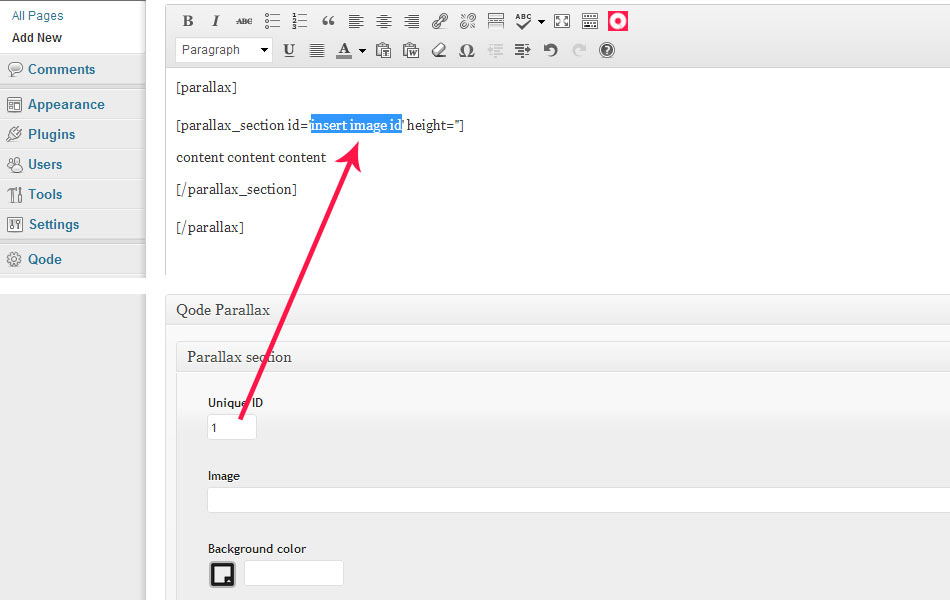
Step 3. Add text, images or any other shortcode (columns, tabs, accordions, messages etc) in the editor within the parallax section shortcode to customize it.
* You can adjust the speed of parallax effect in the Qode Options.
Blog
BLOG LIST
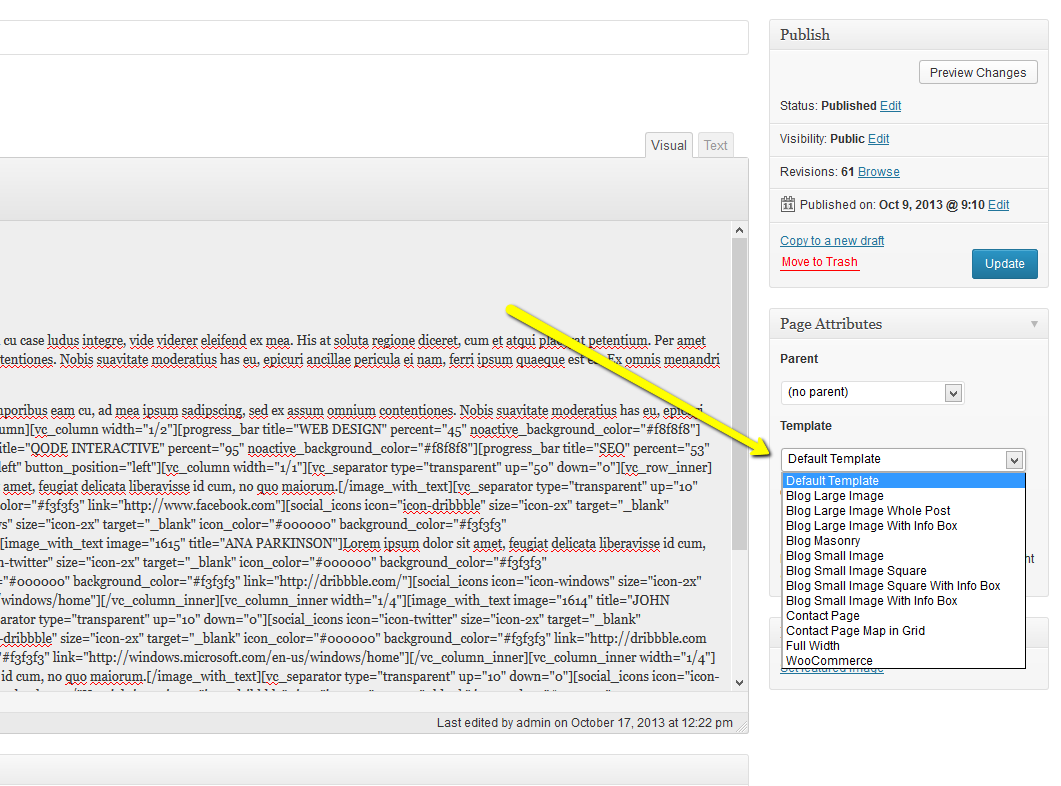
In order to create a blog page, first create a new page and select one of 3 Blog Templates listed in Template field located in the “Page Attributes” section:
- Blog Large Image - Displayes featured image in full width
- Blog Large Whole Post - Displays featured image in full width and whole blog post content
- Blog Large With Info Box - Display whole blog post conten and info box containg date & like
- Blog Masonry - creates masonry layout
- Blog Small Image - displays featured image on the left side and excerpt on the right side
- Blog Small Image Square - displays square shape featured image on the left side and excerpt on the right side
- Blog Small Image Square With Info Box - displays square shape featured image on the left side and excerpt on the right side and info box containg date & like
- Blog Small Image With Info Box - displays featured image on the left side and excerpt on the right side and info box containg date & like
If desired, one of four sidebars can be turned on in the options below editor in Qode Custom Fields section.
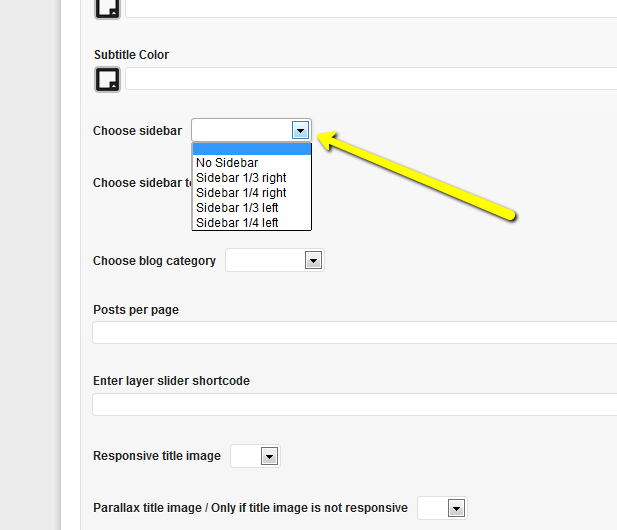
Choose sidebar to display
You can choose here custom sidebar you created. If empty, it will use Sidebar Page.
Choose blog category
You can display post of selected category
Posts per page
Enter number of posts displayed on each page
BLOG SINGLE
SUBWAY theme blog uses featured images as primary images displayed on the blog list page. Featured images are also used as first images in every post by default.
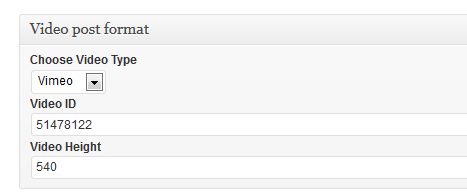
SUBWAY theme supports custom post formats. You can choose one of the following formats:
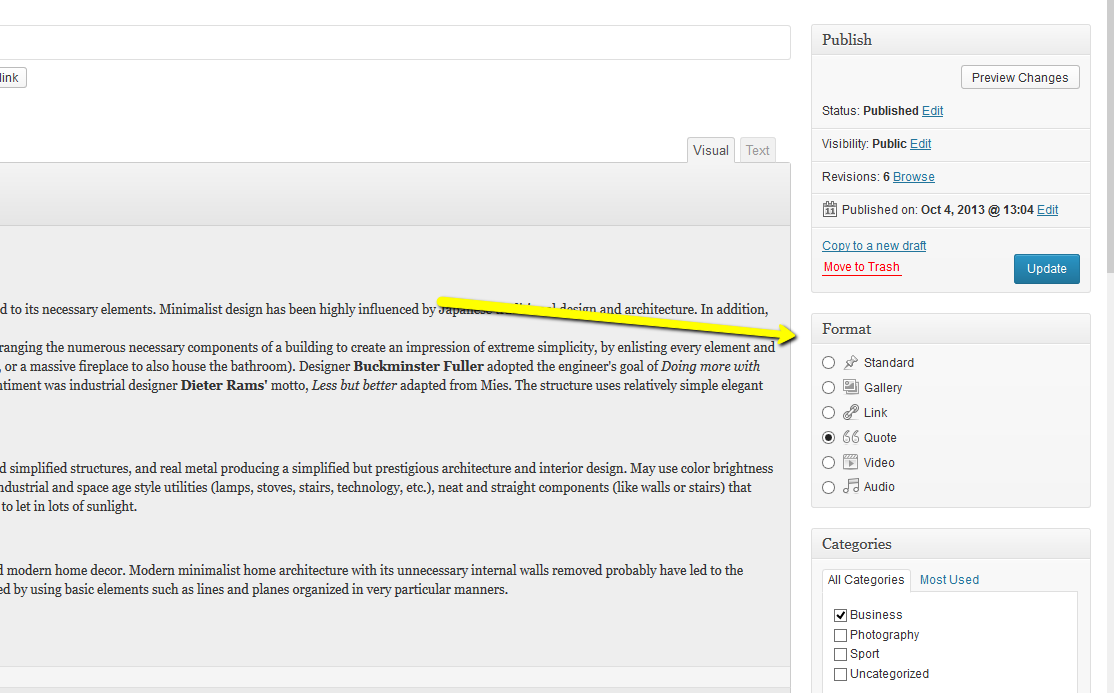
Each format creates custom fields section below editor. For example, video format creates this:
Make sure custom sections are enabled in Screen Options found in the top right corner of WP dashboard.
Similar as blog list, blog single also allows managing sidebar options in Qode Custom Fields. If Choose sidebar to display field is blank, Sidebar widget area will be used.
Portfolio
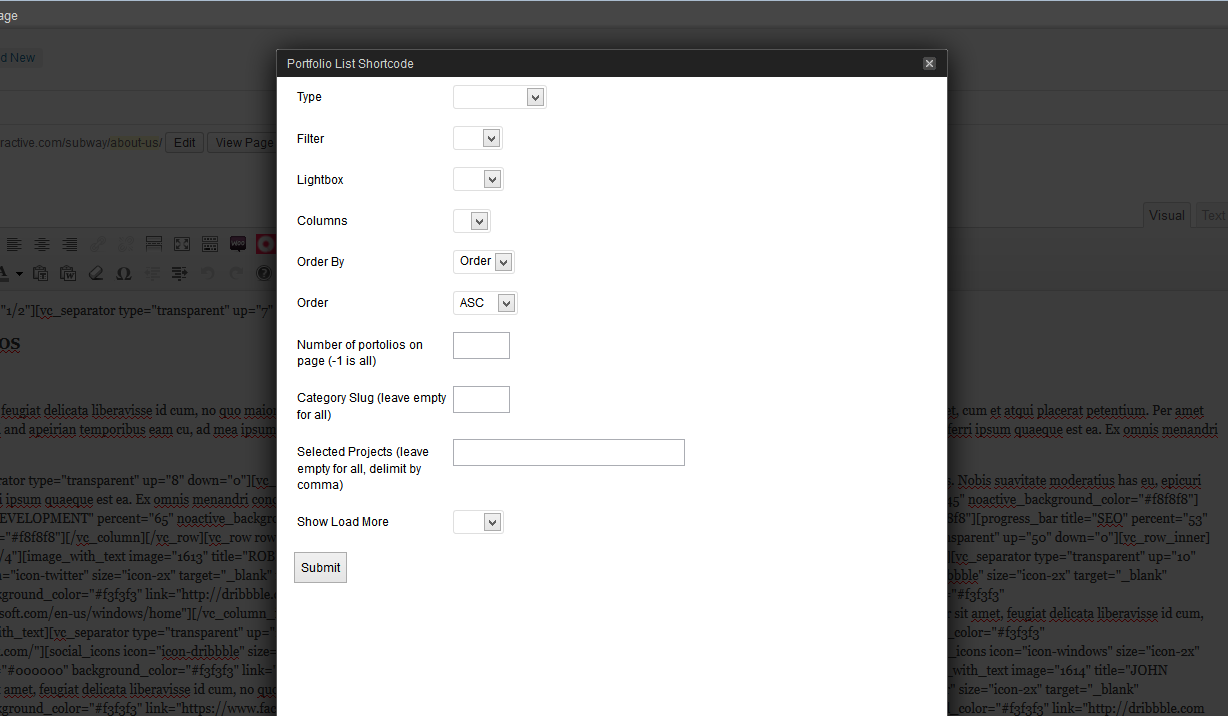
See the new Portfolio post type in the left WordPress menu. In order to create a portfolio page, create a new page and enter the Portfolio List shortcode from the Q dropdown menu in editor (e.g. [portfolio_list type="bottom_text" columns="2" filter="yes" lightbox="yes" show_load_more="yes" number="8"][vc_separator type="transparent" up="20" down="20"]). This will generate a portfolio list page which will be empty if there are no Portfolio projects added.
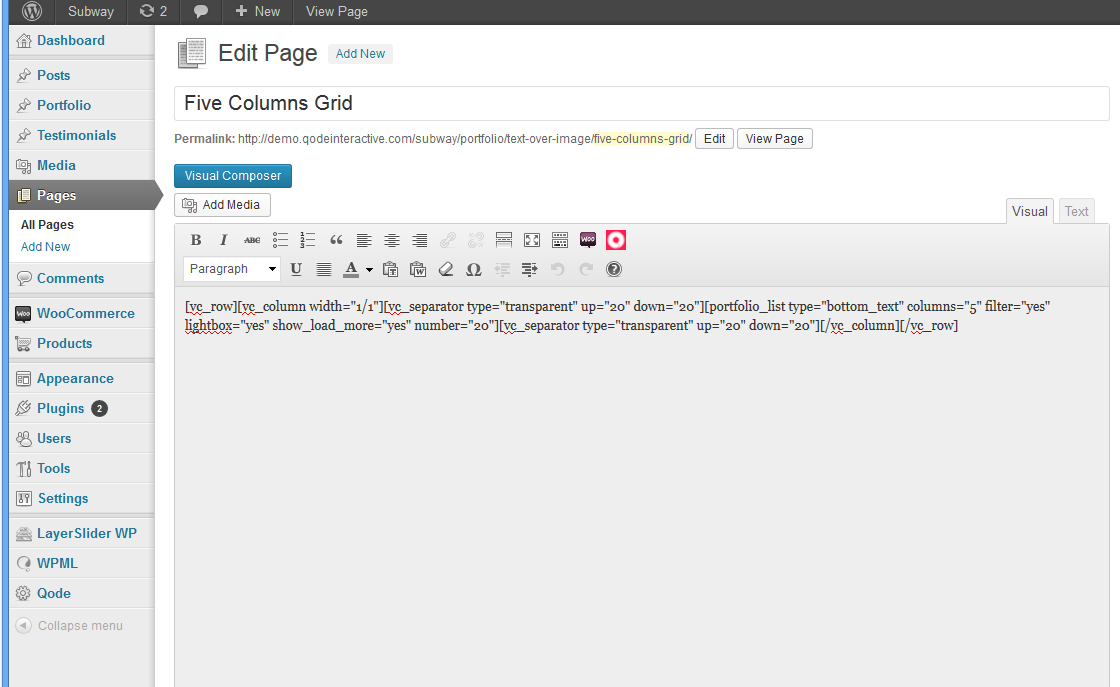
Portfolio shortcode allows listing only posts from certain category as optional setting. You should add "slug" of chosen category when placing shortcode to page. This is very useful if you want to create different pages for different categories.
Also, portfolio shortcode is updated to render sub-categories in filter. It will render only one level of children.
Adding Portfolio items is the same as creating blog posts. Featured image is used for portfolio lists.
You can choose between 6 different layouts listed in Choose portfolio single view field.
Portfolio images are added through “Portfolio Images” link below editor.
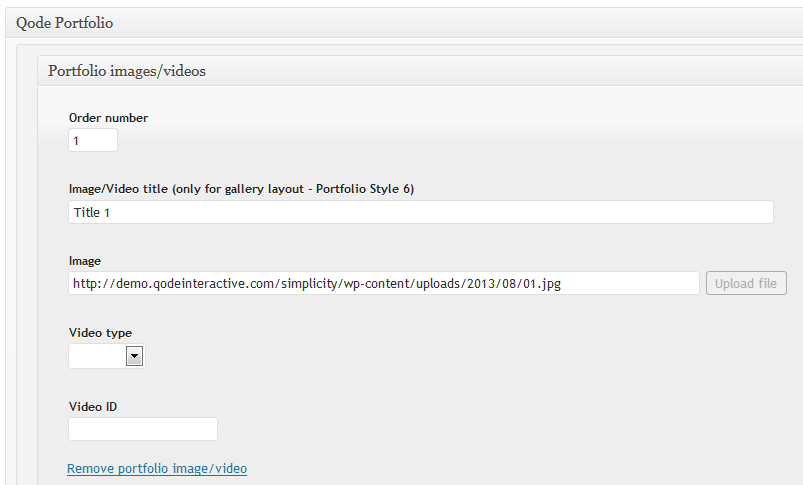
Also our theme allows adding videos together with images. Please not that when adding new Portfolio image/video item, if you want video to display, you should leave image field empty. Also, in the Video field, you should just enter ID, based on Video type chosen (Vimeo or Youtube).
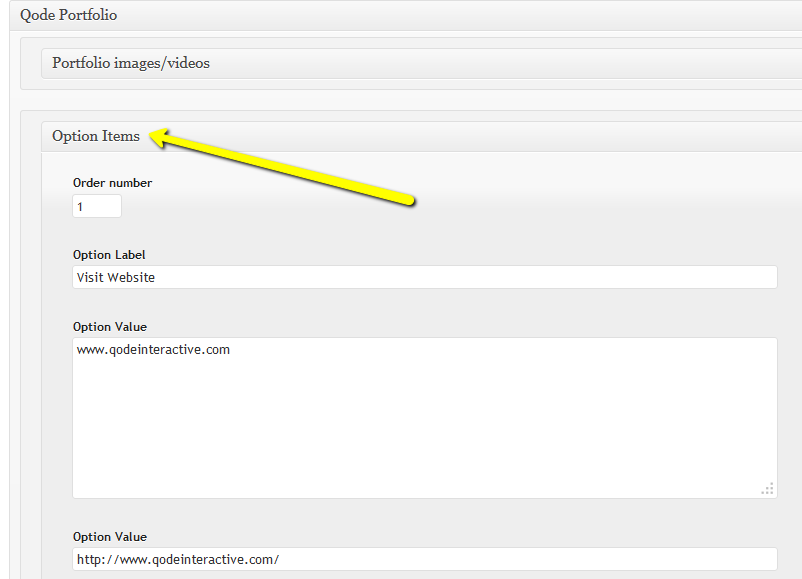
Create custom label name (e.g. Project URL) using the “Option Items”.
WooCommerce
Subway Theme comes with WooCommerce integration, which allows you to build online shop.
For more details on installing and configuring WooCommerce, please visit this page:
http://docs.woothemes.com/documentation/plugins/woocommerce/getting-started/
Subway Theme requires that WooCommerce CSS is not enabled in its settings.
In order to setup WooCommerce with our theme please perform following steps:
- Go to Plugins in the left menu
- Click on Add New
- Type "WooCommerce" in the search field
- Locate "WooCommerce - excelling eCommerce" in the search results and click on Install Now below it
- Once install is done, click on Activate Plugin
- You will see a notice saying "Welcome to WooCommerce – You're almost ready to start selling :)". If you plan to import demo content click on "Skin Setup"
- Go to Importing demo content instructions in the Introduction section of this document and perform the process explained there
- Once import is completed click on WooCommerce > Settings from the left menu
- Uncheck "Enable WooCommerce CSS" field and click Save
- Click on Pages tab of the WooCommerce Settings
- Select existing pages for all field except Terms Page ID. You will be able to find all pages easily as they match name of each field
Visual Composer
Subway Theme comes with awesome Visual Composer plugin. Its documentation is included with our documentation.
List of Shortcodes
This is a list of all shortcodes available in this theme. Please note that some shortcodes have additional attributes (options) in pop-up window once selected in the dropdown menu.
Accordion
Action
Blockquotes
Bordered Box
Box
Button
Columns: 1/2 + 1/2
Columns: 1/3 + 2/3
Columns: 2/3 + 1/3
Columns: 1/3 + 1/3 + 1/3
Columns: 1/4 + 1/4 + 1/4 + 1/4
Columns: 1/4 + 3/4
Columns: 3/4 + 1/4
Columns: 1/4 + 1/2 + 1/4
Columns: 5/6 + 1/6
Columns: 1/6 + 5/6
Columns: 1/6 + 1/6 + 1/6 + 1/6 + 1/6 + 1/6
Columns: 1/6 + 2/3 + 1/6
Counter
Cover Boxes
Custom Font
Dropcaps
Expandable
Highlight
Image With Text
Image With Text Over
Image With Text and Icon
Icon
Icon List Item
Icon With Text
Latest Posts
Line Graph
List - Ordered
List - Unordered
Message
More/Less Facts
Parallax
Pie Chart
Pie Chart 2 (Pie)
Pie Chart 3 (Doughnut)
Portfolio List
Pricing Table
Progress Bar - Horizontal
Progress Bar - Icon
Row
Section
Separator
Separator With Text
Social and Brands Icons
Social Share
Steps Animation
Tabs
Testimonials
Video